As we’ve gone down this path of trying to design a proper house with no building experience, each step has become more confusing. Starting with wall assembly, we gained some confidence that we can do this. Next, roof assembly required more thought and reading to propose something that may have potentially. And if the roof introduced a trickle of doubt, the basement opens the flood gates. Let’s be honest – without talking to experts, we’ll only be able to take the design so far. Still, we’ve given it a shot, and will continue to refine it. Hey, at least we now know more about basements and foundations than we ever thought we would.
Insulating Inside or Out
As with every building question we’ve had, we start by finding the topic on Green Building Advisor. After reading How to Insulate a Basement Wall, we’re left with two choices: interior or exterior insulation. We’re leaning towards the interior route for a few reasons:
- We know we want a finished basement, so 2x4 walls will be going up anyway.
- We won’t have to deal with foam underneath the footings, which we believe more builders will be comfortable with.
- We won’t have to worry about how to finish the above grade portions of the wall.
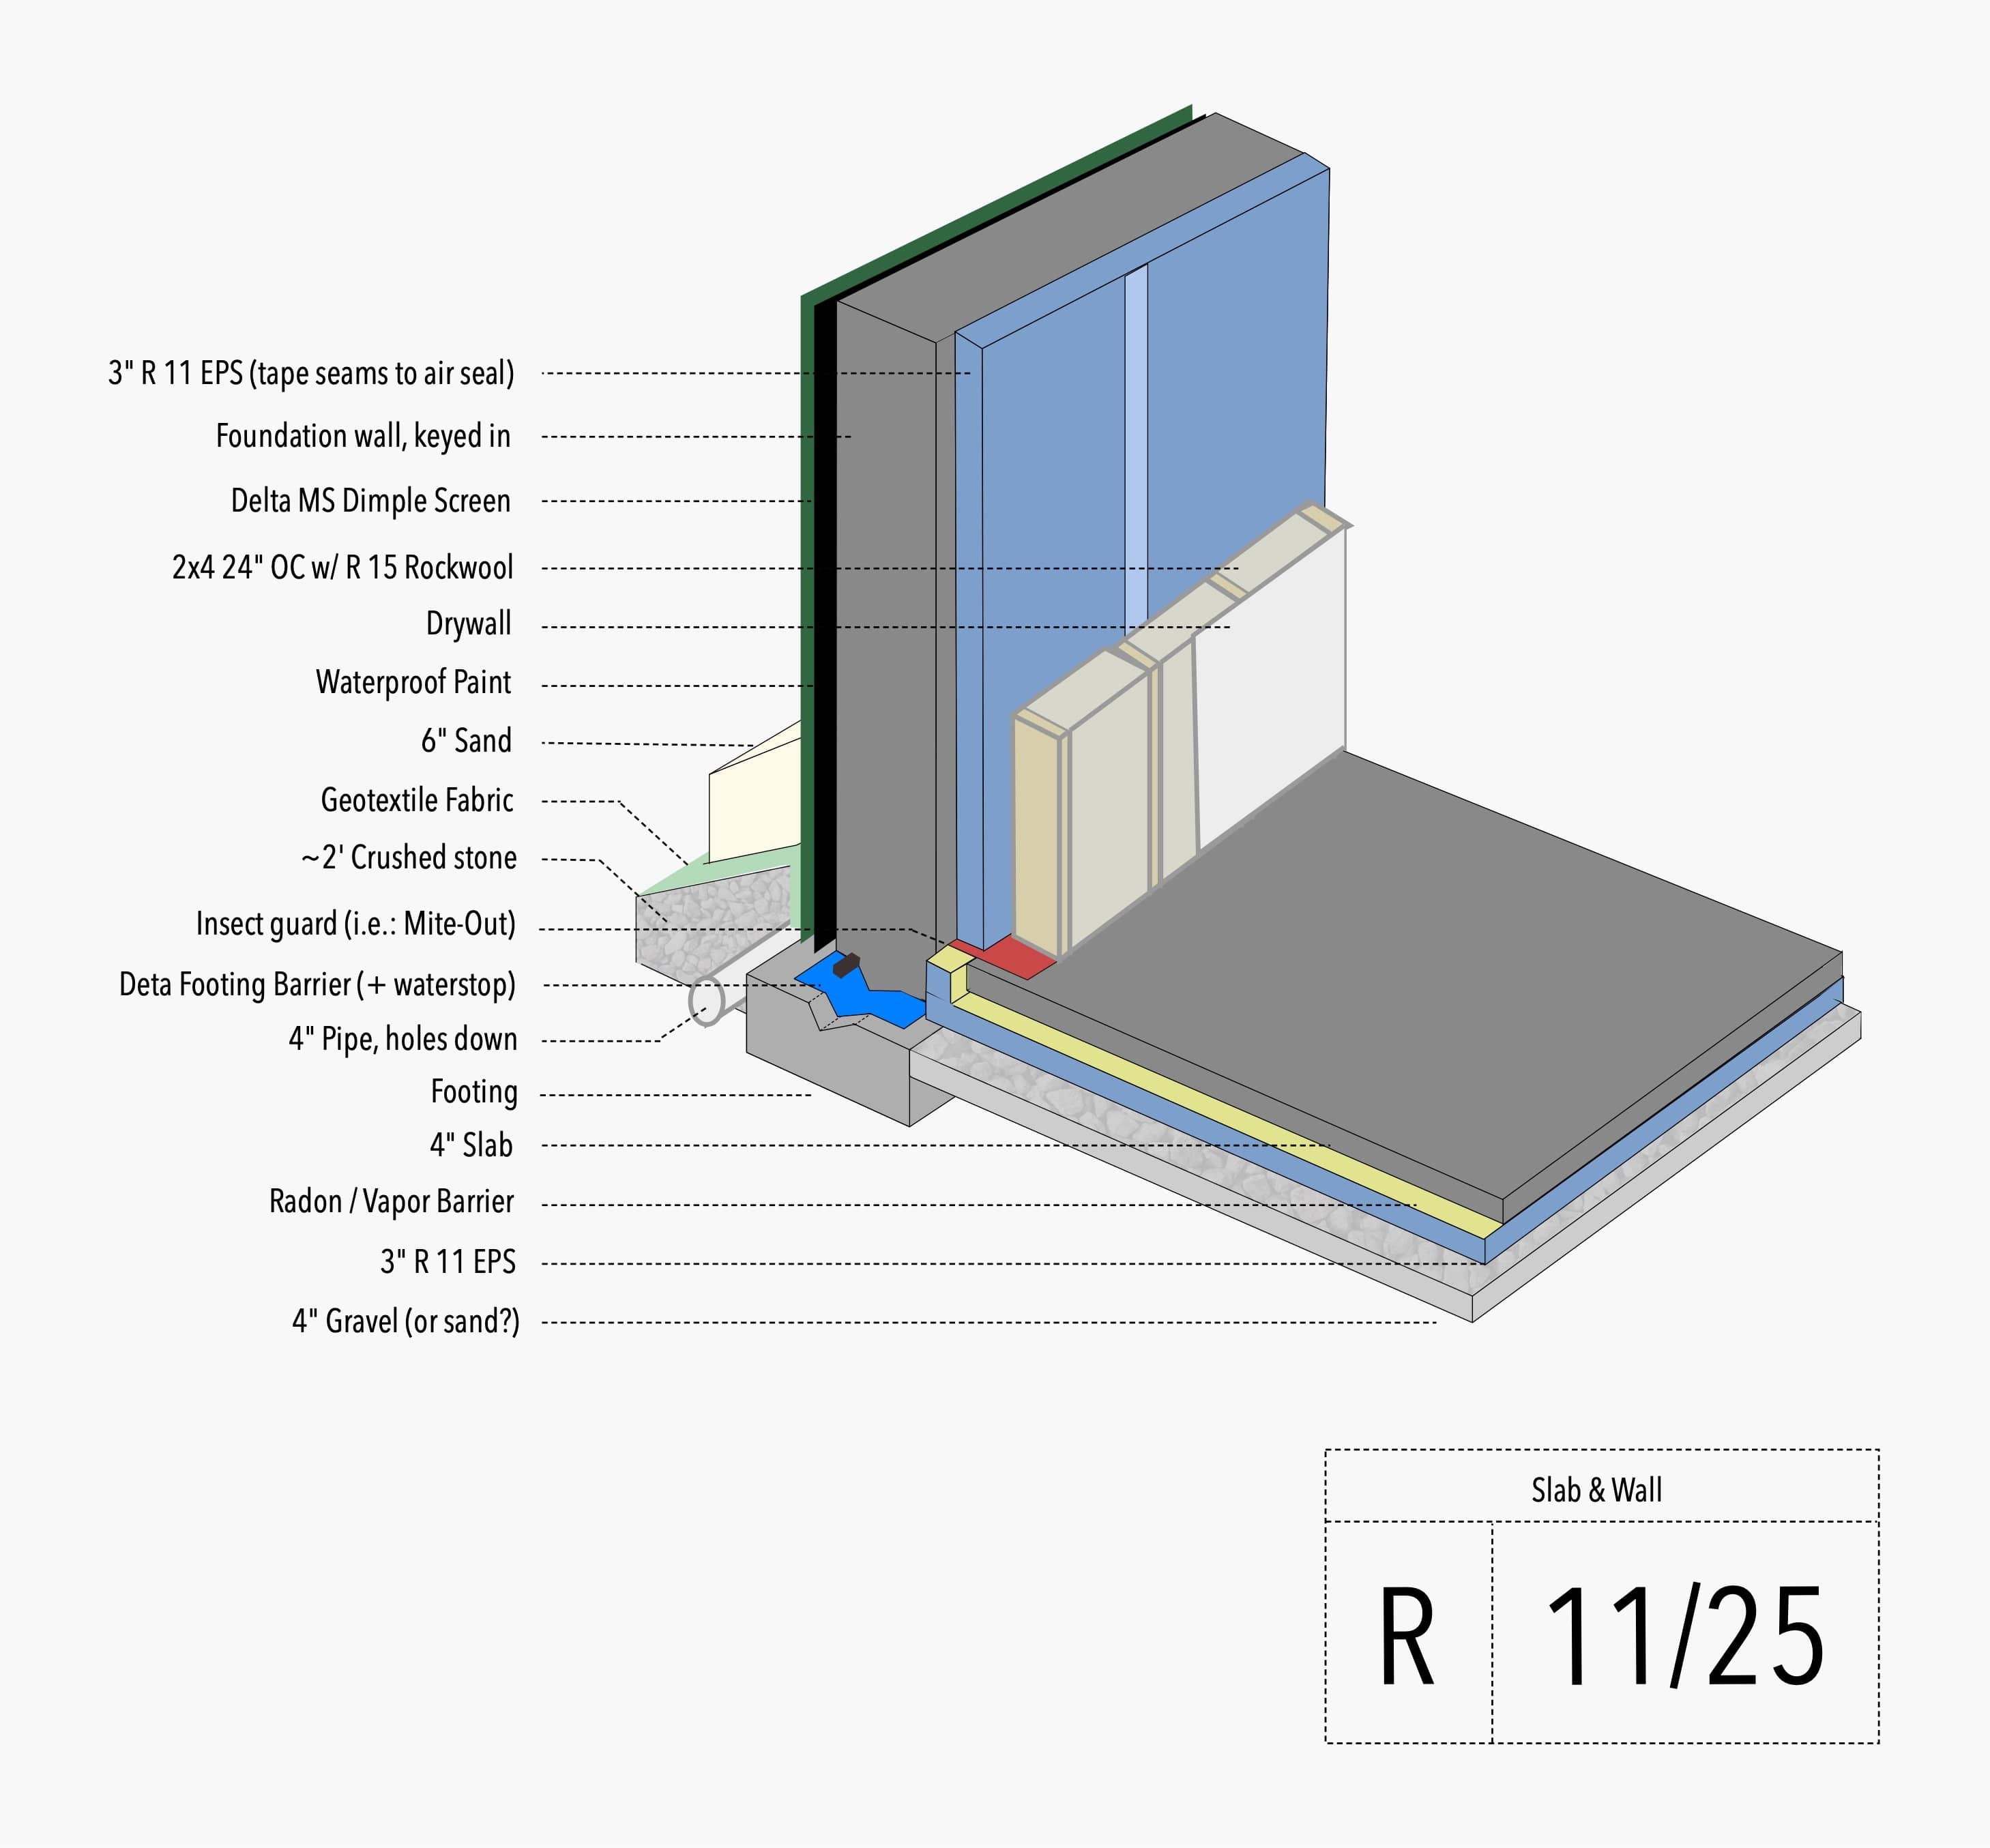
Once that decision was made, our next step was to find working examples out in the wild. The best example we’ve found is from Hammer & Hand in their best practices on basements for new construction. Our rendering above is not just a shallow copy of this – we actually went through and verified each claim in the manual from other sources, and only ended up with minor tweaks from the H&H manual.
Insulating the wall: Rigid foam attached directly to the walls, followed by 2x4’s with Rockwool in them. The insulation that touches the basement walls must not be air permeable, or else condensation will become an issue.
Under slab insulation: To reach R-10, we’ll just need 3" of EPS underneath the slab. We may consider upping this to 4" to get R-15 for the same labor, but well wait for concrete data on that decision.
Thermal break the slab: The tricky part is the transition between the slab and the basement walls. A ton of heat is lost through this thermal break, so we’ll need slab edge insulation. At first, we thought this would just be the basement wall insulation. However, after discussing on Green Building Advisor, we’ve been advised of a few things: use FoamGlas if available; cover gap with Mite-Out or Termistop if FoamGlas can’t be purchased; compacted sand barriers can be a natural deterrent to termites.
Water Barriers
Building Science goes into the 3 water related concerns to consider when building a basement. Here is how we’ll address each.
Ground water entry: A dimple mat appears to be the consistent way of stopping water coming in from the sides. A water proof paint on the foundation walls could be used as well for redundancy, but if the walls crack then this layer will do nothing. Green Building Advisor covers the debate on whether or not two layers are appropriate.
As the water moves down, there are two areas to consider. First, we’ll add a waterstop to prevent entry above the footings. Next, some sort of way for the water to move away from the foundation is needed. That’s where a drain pipe comes in. Universally, gravel around the pipe is recommended with a fabric surrounding the gravel:
Lay the drain pipe, perforations down, in a gravel trench with at least 6 inches of ½-inch to ¾-inch washed gravel or stone above the pipe and at least 2 inches below
On top of that, Green Building Advisor is one of the first we’ve seen recommend an additional 6" layer of sand on top of the fabric.
We have foundation walls! Vapor barrier took a beating, but nothing a little TLC cant fix before the slab. Note to anyone building a #PassiveHouse with every day subs: You'll have to explain the importance of protecting the vapor barrier 1000 times. And still fix it anyways pic.twitter.com/diXmD9FkLa
— LakeMeridianPassiveHouse (@LMPassiveHouse) March 27, 2019
Capillary rise: It seems that widespread adoption of a product between the footings and foundation walls to prevent capillary rise has not occurred. Building advisors constantly recommend this. For an example in the field, Kimchi & Kraut detail how their foundation company had no problem trying something new. We would be looking at the same Delta footing barrier to prevent water rising. Additionally, some sort of vapor barrier will be needed under the slab. We haven’t selecting a product for this yet, but we do know that we want something durable to handle the abuse (as described by the Lake Meridian Passive House). Delta Underslab would be appropriate here.
Condensation from interior air: We’ll want to prevent air from both the inside and the slab edge from reaching the foundation walls. The two details to consider are sealing the vapor barrier to the walls, and also creating an air barrier with the EPS on the walls. To do this, a tape or foam is needed:
To prevent interior air from reaching the cold concrete, make sure to seal the perimeter of each piece of rigid foam with adhesive, caulk, a high-quality European tape, or canned spray foam.
Radon
We’re still trying to figure out if radon will be an issue for us. If it is, a pipe will have to go through the basement slab and then exit the house at either the roof or side walls. The video below walks through the installation of this piping according to the EPA’s Build Radon Out.
Radon mitigation in new construction
Transitions
We plan to detail transitions from wall to roof, and basement to wall in a different post. Here are some notes for now:
Walk Out Basement?